Fluffy milk buns loaded with golden cheddar cheese and crispy bacon! Cheese and bacon rolls are a popular Aussie snack loved by kids and adults. Of course, you can just buy these from the local bakery or at the big supermarkets (Coles and Woolies). But it is so much more special when it's homemade, even better, when a yummy twist is involved.
This recipe will yield the most delicious milk buns that you didn't know was missing in your life. Give it a go, it is well worth the effort.

For those not familiar with the classic cheese and bacon rolls; the rolls are usually flatter and lacks the touch of richness.
Let me show you the way. That's fluffy, round and filled with happiness.
Jump to:
Ingredients
Don't get fooled by it's cheesy and glorious appearance. It's actually a simple recipe.
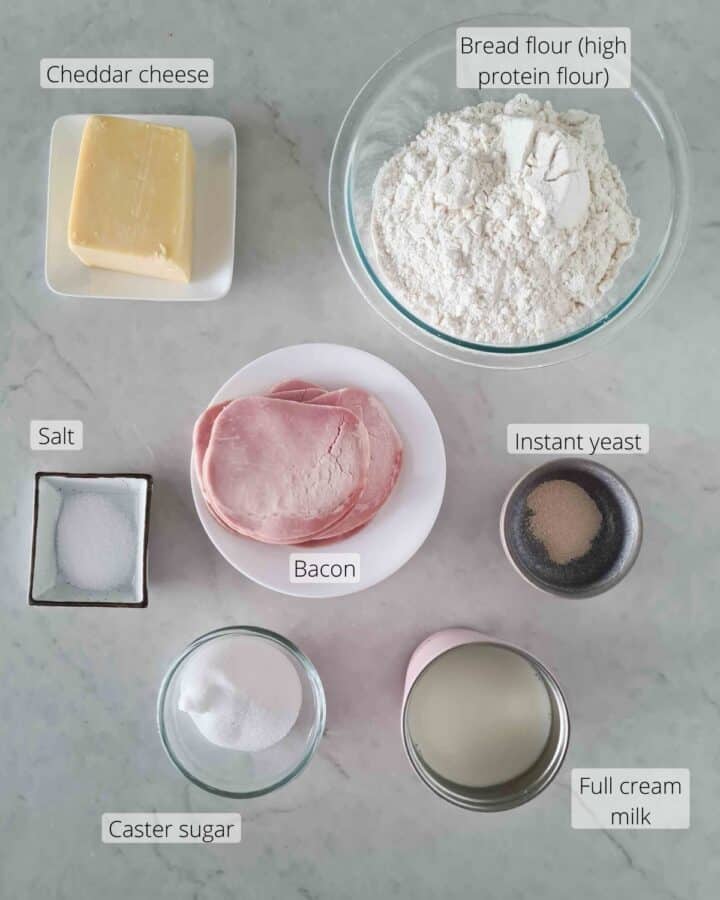
- Full cream milk is what makes the buns so delicious and flavoursome. Can substitute for just water. It'll still be tasty but just not to it's potential 😉 Although, if using water only, the buns will be even lighter and a little airier. Which is nice too.
- Bacon can substitute for ham (if you must). Lean bacon is used here, fatty bacon will get too oily since a lot of cheese is involved.
- Cheddar cheese due to its trusty flavour profile. For a stretchy magic straight out of the oven, use half cheddar, half mozzarella.
- Bread flour (aka strong flour) is just flour that is high in protein content. Protein is what will help develop enough gluten so that the buns can rise tall and proud. They're available at most major supermarkets.
Equipment
Before you start, make sure you've got a stand mixer with a dough hook. A stand mixer will do all the heavy lifting in this recipe. You can knead the dough by hand but it'll take a lot of sweat and involves a decent workout. Unless you're experienced in kneading bread doughs by hand, a stand mixer the way to go.
It'll guarantee proper kneading which is necessary to help gluten to develop and dough to puff and rise nice and proud.
This is how you make it
Although simple, like all bread recipes, there's a lot of letting the dough do its thing (ie, letting the dough rise). This recipe will require the dough to rise twice. Once, just after kneading and then another after the buns have been shaped.
Double proofing helps the dough develop a more complex flavour and finer texture.
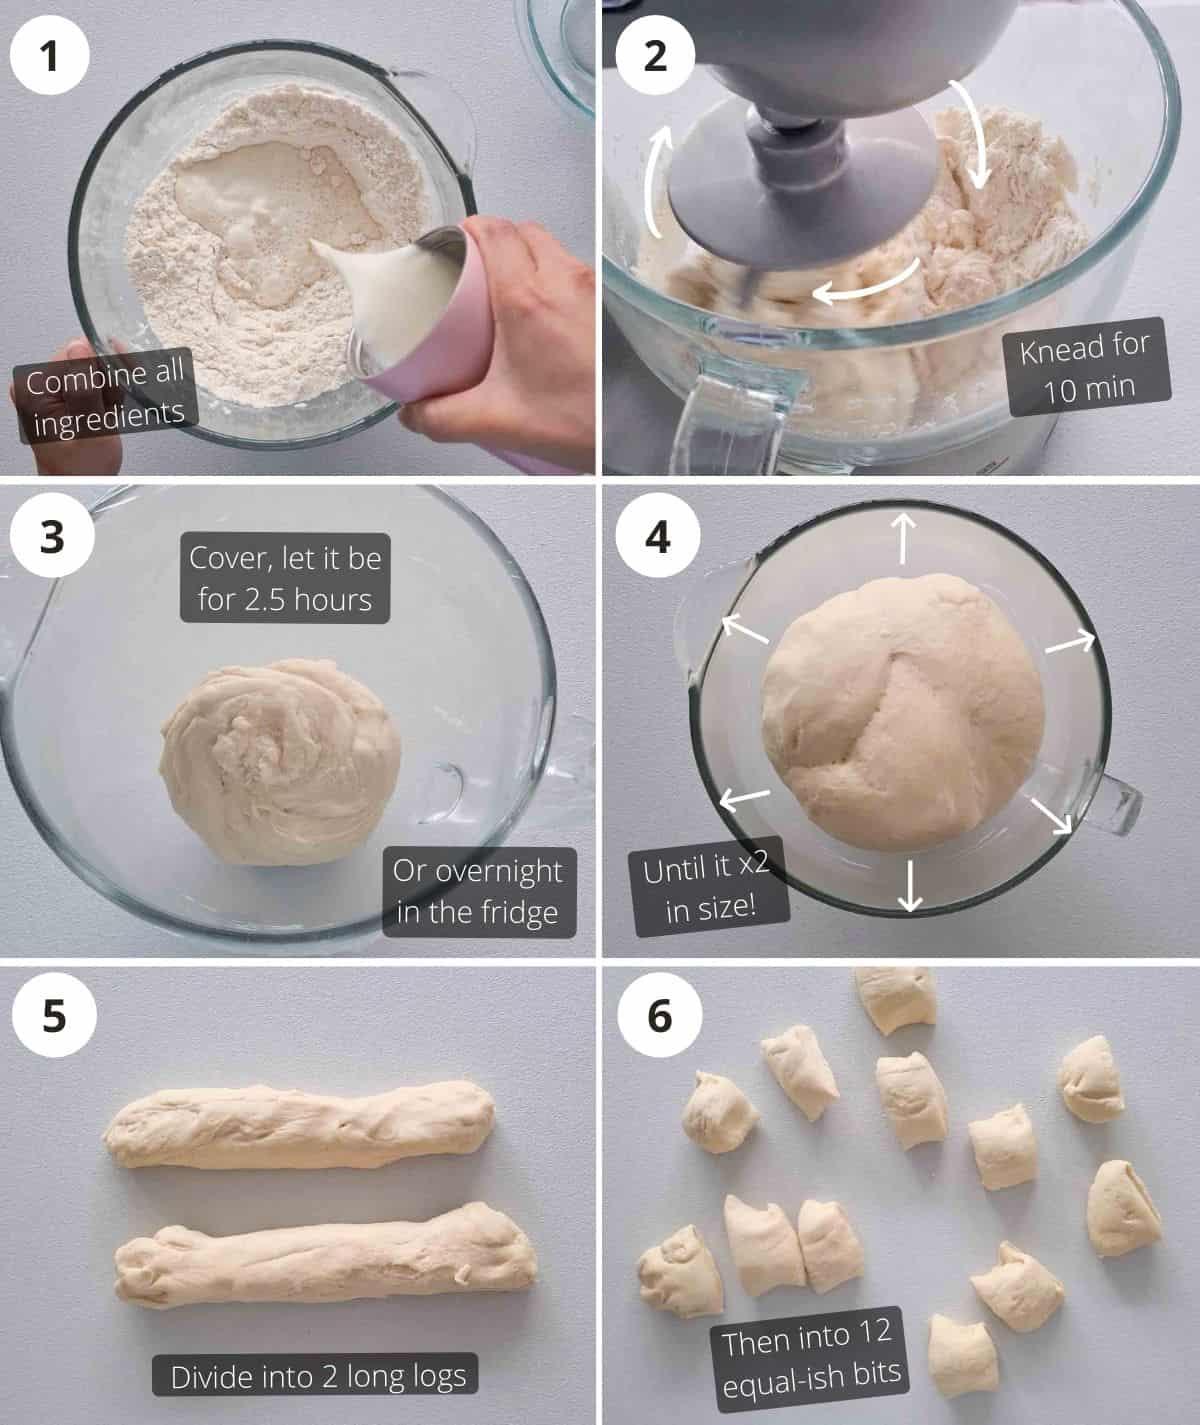
Knead and first rise
Similar to my super indulgent and yummy Chocolate Brioche Babka recipe, you want to knead the dough for about 10 minutes using the stand mixer. This is what makes the buns light and fluffy. Although, unlike the chocolate brioche babka, you won't need to perform the windowpane test for this recipe.
Once the dough is done kneading, cover with cling film (plastic) or a damp towel and place it in a warm place. A trick for a warm place, especially if it is a cold day is by leaving the dough in a warm oven. Warm up the oven by turning it on for a couple of minutes on the lowest heat, then turn the oven off (important!) Place the dough into the oven with the door closed.
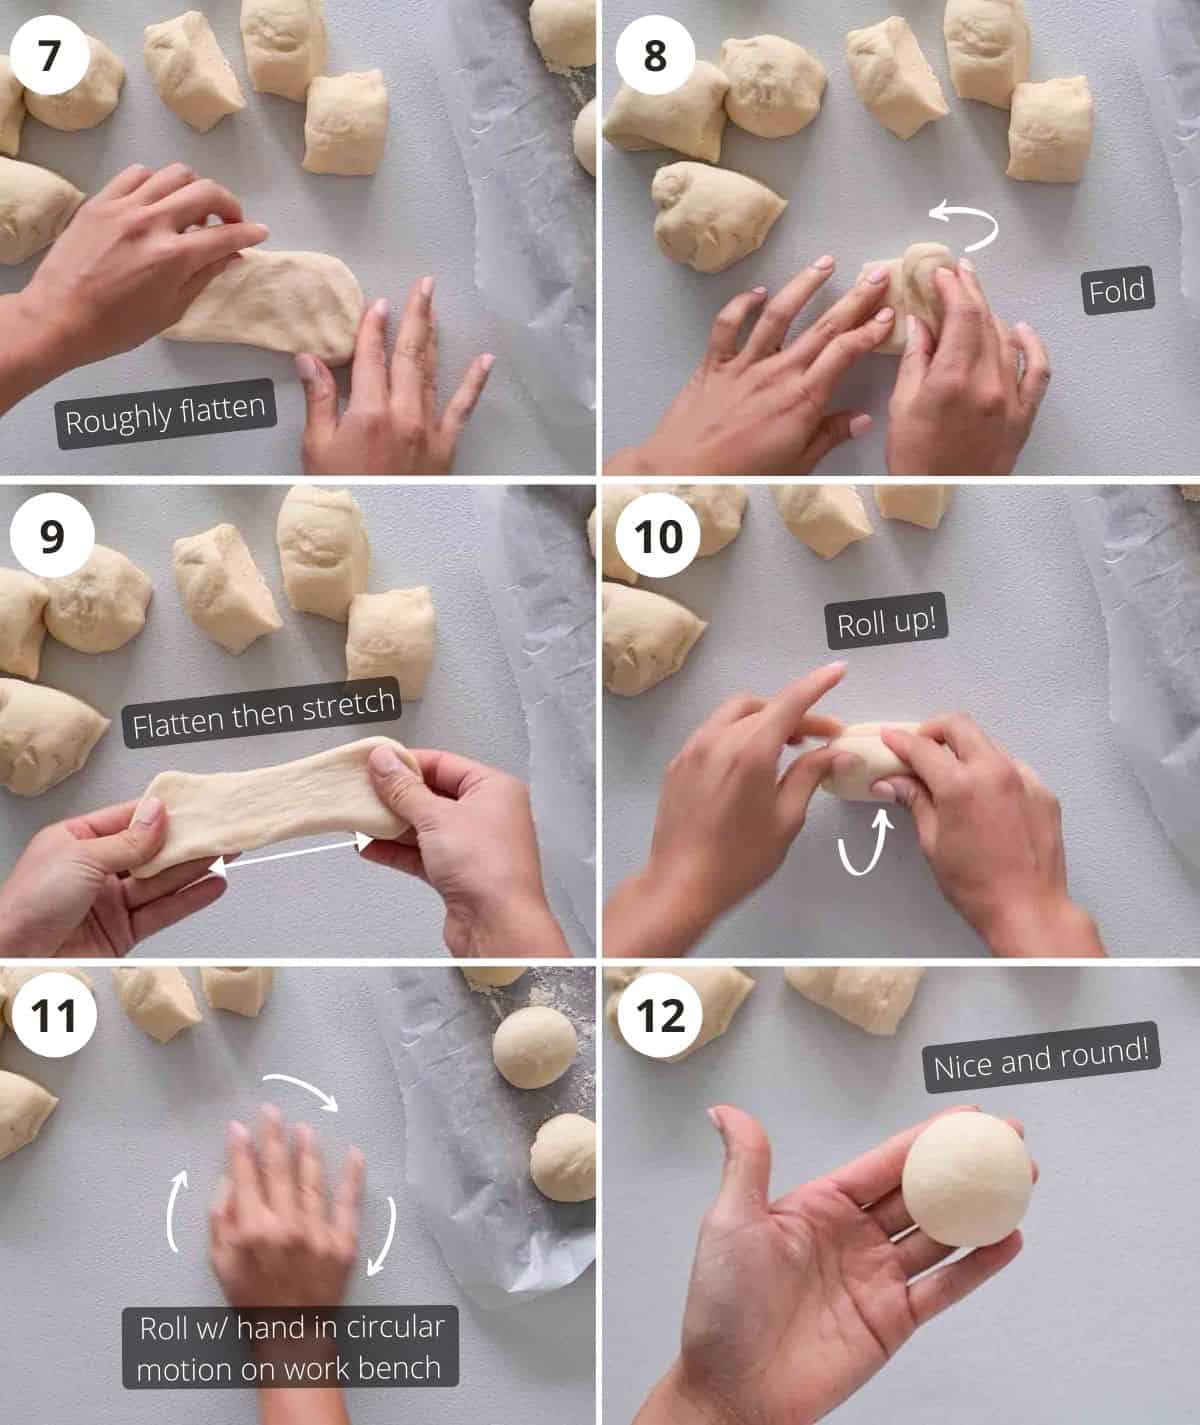
Create layers in the buns (images #7 - #12)
Once the dough has risen and doubled in size, it is time to shape the milk buns. First, divide the dough into 12 equal-ish pieces.
Take one piece, flatten it into a rectangular shape with your hands. Lengthways, fold one-third of the dough into the middle then bring the other end into the middle. Flatten again and lightly pull/stretch the dough into a rectangular shape. Tightly roll the dough up, lengthways.
Now, with the dough on the workbench, push down with one hand (in the shape of a claw) and roll in a circular motion. The dough will be locked in by the clawed hand. Continue to roll the dough with pressure until a smooth, tight, round ball is formed. Repeat for all 12 dough pieces.
Second rise and bake
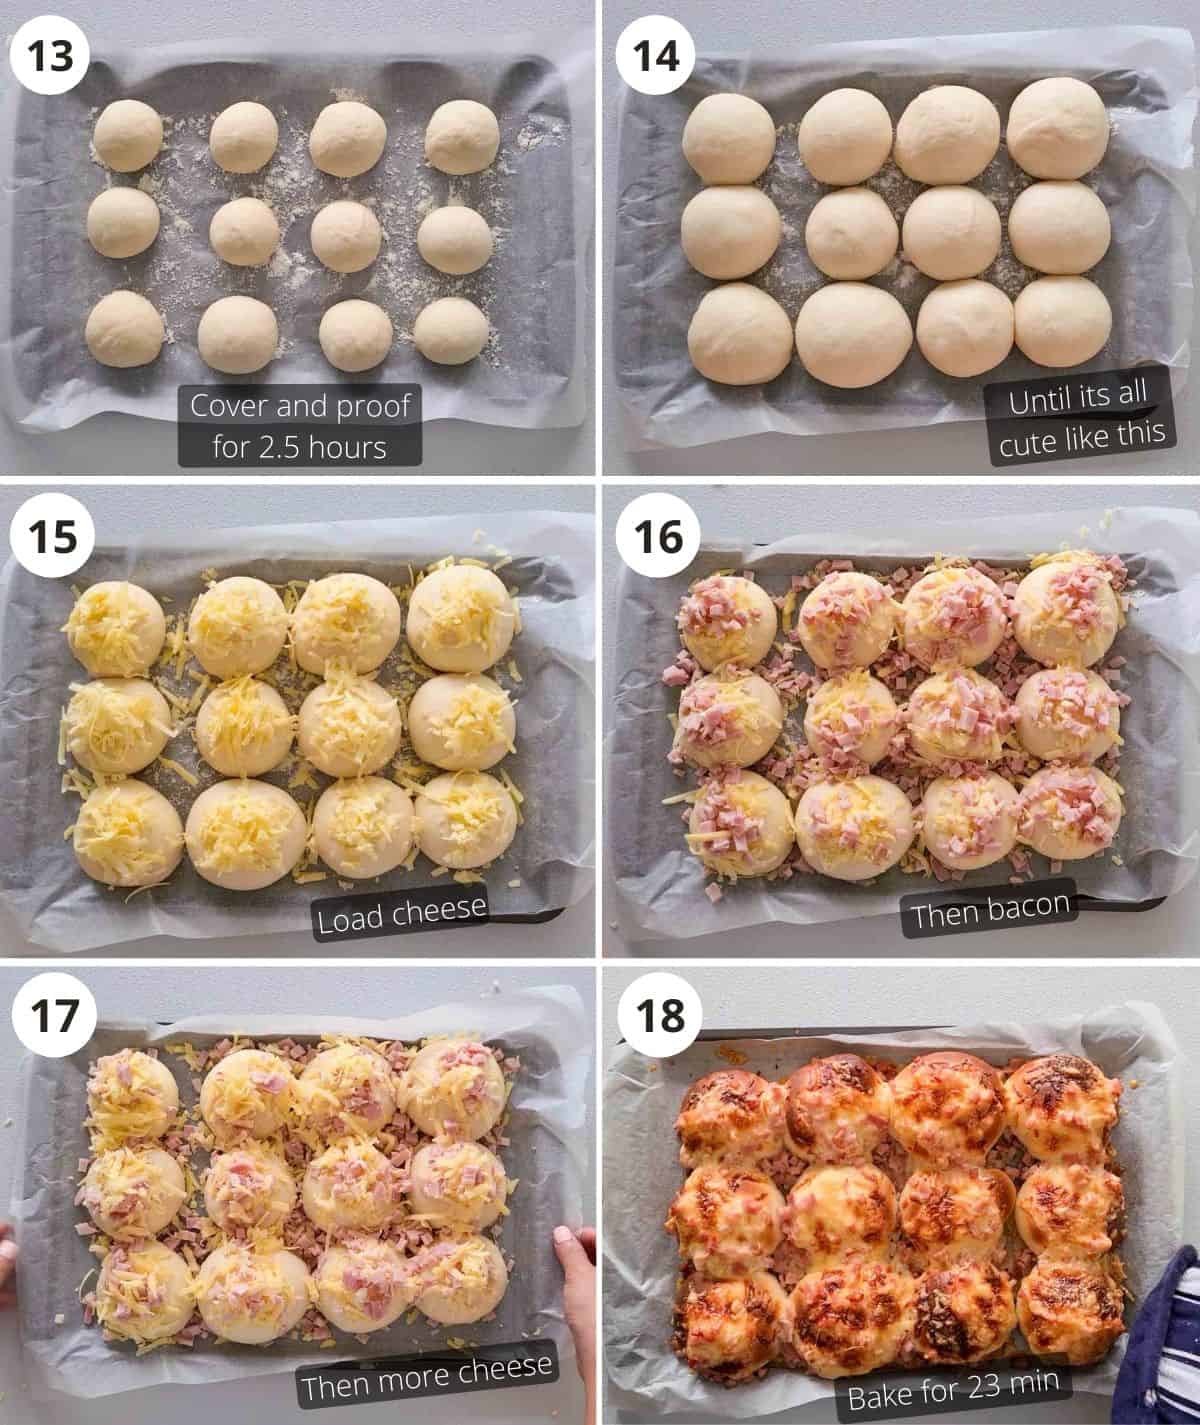
Evenly place the 12 tightly rolled balls onto a lightly floured and lined baking tray. Cover again and allow it to proof until it doubles. About 2.5 hours in a warm place (or oven). The warm environment helps the yeast to work its magic and allow the buns to rise. Roughly, you want the environment to be about 25ºC/77ºF.
If proofing in the oven, be careful to not overheat the oven! If you do (I've done so plenty of times), just leave the oven door ajar and let it cool down before putting the dough into the oven. Always triple-check that the oven is not on!
Once the buns are proofed to almost doubled in size, shower it with cheese, then bacon, then more cheese.
Bake at 180ºC/350ºF for 15 minutes then turn the heat up to 200ºC/400ºF for a further 8 minutes or until golden and cheese blisters. Depending on your oven, might need to turn the tray with 4 minutes left for even browning.


See how fluffy and round these cheese and bacon rolls are? So good and so delicious. The perfect snack or even cheeky dinner rolls! Although, 250 calories per roll is not too bad!
Tips for making this perfect every time
- Give the dough time for double proofing to allow the dough to develop deep flavour and a more refined structure.
- Get generous with the cheese and the bacon. It may seem like you're putting a lot on but it'll all make sense once it has been baked. Those that fall through the cracks in between the rolls will stick to the rolls once baked and so nothing's wasted!
- Be patient and let the dough rise until it has doubled in size, especially during the second round. The buns won't rise much in the oven so most of the rising is done before it goes into the oven. Thus, for light and fluffy round rolls you need to let it rise. If it has not doubled in size after 2.5 hours, give it 30 more minutes.
- Tightly roll the dough into round balls. This will ensure excess air is squeezed out, resulting in an even rising of the milk buns.

I have a special appreciation for the cheese and bacon bits on the sides of the rolls. They're, crispy and caramelised to perfection. Like little bonuses to this delicious treat!
Good to know (FAQs)
They are okay to be left out in room temperature, covered for about 2 days before they need to go into the fridge. Cheese and bacon rolls last up to 5 days in the fridge.
Yes! To break this process up, you can let the covered dough slowly rise in the fridge overnight after it has been kneaded. This will also help the dough to develop an even more complex flavour. Continue with the recipe where you've left off the next day. Perfect to start on a Saturday night for a Sunday morning family breakfast!
Leftovers/freezing
When eating the next day, best warm up the rolls in the microwave for about 5 to 10 seconds. This way, the cheese will be slightly melted and buns lovely and soft.
Cheese and bacon rolls will last up to 3 months in the freezer, making these the ideal school snacks for kids too!

Made this Cheese and Bacon rolls recipe? Let me know your thoughts or questions by dropping a note in the comments section below! I'd love to hear from you 🙂
Happy cooking!
Gen
📖 Recipe

Cheese and Bacon Rolls
Equipment
- Stand mixer with a dough hook
Ingredients
- 2 cups cheddar cheese, shredded about 160g
- 1 cup lean bacon cubes about 140g (note 1)
Milk buns
- 3½ cups bread flour (high protein flour) 500g/1.1lbs
- ¼ cup caster sugar 50g
- ½ teaspoon instant yeast 3g
- ½ tablespoon sea salt 10g
- 1⅓ cups full cream milk, warm 350g
Instructions
Knead and first rise
- In a stand mixer bowl, combine all milk buns ingredients except milk. Mix well with a fork.
- Make a rough well in the flour mixture and pour the warm milk into the bowl.
- Attach mixing bowl onto the stand mixer, fitted with a dough hook. Knead on low speed for 1 minute.
- Increase speed up to medium-high and knead for 10 minutes. Depending on the brand of your mixer, you might need to hold the mixer in place to stop it from moving too much.
- The dough should be smooth and elastic. Cover with cling film (plastic) and let it rise in a warm place (such as the oven) for 2.5 hours or until it has doubled in size. (note 2)
Shape the buns
- Scrape the risen dough onto a (clean!) workbench and divide into two even logs with a knife or a dough scraper. Divide the dough logs into 12 even pieces.
- Take one dough piece, flatten it into a rectangular shape. Lengthways, fold one-third of the dough into the middle then bring the other end into the middle.
- Flatten again and lightly pull/stretch the dough into a rectangular shape. Tightly roll the dough up, lengthways.
- Put the rolled dough on the workbench, push down with one hand (in the shape of a claw) and roll in a circular motion. The dough will be locked in by the clawed hand. Continue to roll the dough with pressure until a smooth, tight, round ball is formed.
- Repeat for all 12 dough pieces.
Second rise and bake
- Place the rolled dough balls onto a lightly floured and lined baking tray. Cover with cling film/plastic and proof for 2.5 hours or until roughly doubled in size. (note 2)
- If proofing buns in the oven, remove from the oven. Preheat oven to 180°C/350°F.
- Uncover the tray and generously load dough buns with shredded cheese (about 1 cup) then top with bacon cubes. Finish up with sprinkling remaining cheese.
- Bake on the middle shelf of the oven for 15 minutes then turn heat up to 200°C/400°F and bake for a further 8 minutes or until bacon crispy and cheese golden and blistered. Turn the tray with 4 minutes left of baking time to allow even colouring and cooking.
- Rest for about 10 minutes on a cooling rack then dig in!
Notes
Nutrition
Other recipes you might like


Leave a Reply